I2C 통신의 정의
아두이노 및 MCU를 사용하다 보면 한 번쯤 접하게 되는 단어 중에 I2C(Inter-Intergrarted Circuit) 라는 단어가 있다. 이것은 기기 제조사들 간에 미리 약속된 데이터 통신 규격이며, 전원을 제외한 2개의 선으로 기기간에 통신을 할 수 있게 해 둔 '통신 프로토콜' 이다.

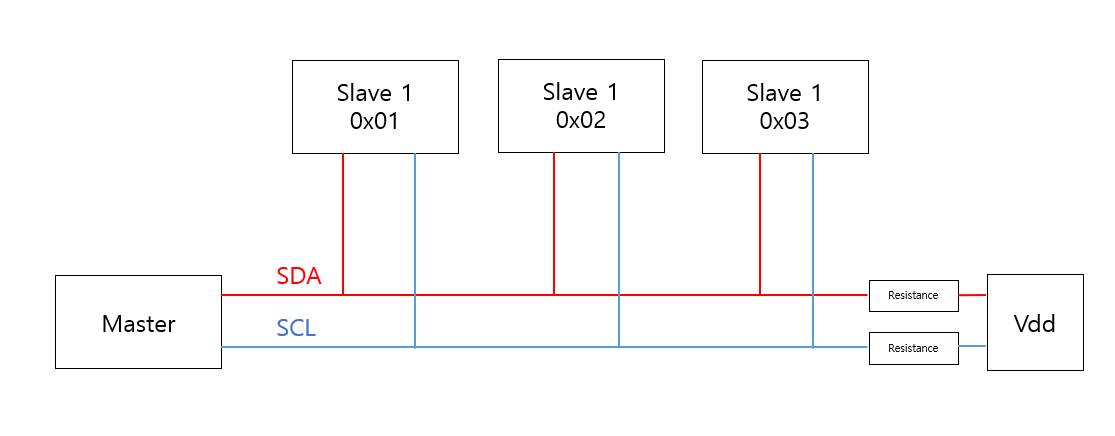
위의 그림은 I2C 통신을 위한 배선을 그린 그림이다. I2C 통신은 마스터 기기와 슬레이브 기기가 존재한다. 이 둘은 클럭 데이터를 기준으로 동기화되어 통신이 이루어진다. 마스터 기기는 슬레이브 기기와의 통신으로 슬레이브 기기를 제어할 수 있으며, 슬레이브 기기는 하나 이상의 마스터 기기와 통신이 가능하다. 슬레이브 기기는 각자의 주소값을 가지며, 최대 1008개까지 지원한다. 하지만 실제로 사용할 때는 제약이 많이 있다.
I2C 통신의 장점과 단점
I2C는 UART(직렬)통신과 비교하면 데이터 손실의 위험이 적다. 왜냐하면 직렬 통신은 기기 간에 미리 데이터 처리 속도를 동기화 시켜야 한다. 그렇지 않으면 데이터가 손실되어서 전송이 된다. 하지만 I2C 통신은 클럭 데이터를 이용해서 데이터가 시작하는 신호에 맞추어 자동으로 동기화가 이루어진다.
SPI 통신이랑 비교하면 필요한 핀의 수가 적다는 것이다. SPI통신은 필요한 핀의 수가 4개이다. 하지만 I2C 통신은 필요한 핀의 수가 2개밖에 되지 않는다. 즉 비교적 단순한 배선으로 통신을 할 수 있다. 하지만 SPI에 비해서 최고 속도가 느린것이 제일 큰 단점이다. SPI 통신은 수 Mhz 클럭 속도지만 I2C 통신은 수백Khz 클럭 속도를 가진다.
I2C 통신의 실질적인 활용법
초보 메이커 들에게는 주로 아두이노를 이용한 기타 기기와의 연결이 I2C를 쉽게 접할 수 있는 방법일 것이다. OLED 디스플레이, I2C LCD 디스플레이, 자이로센서, 온습도센서 등 여러가지 기기들을 통해 I2C 통신을 할 수 있다.
이를 사용하기 위해서는 기기의 주소값을 미리 알아두어야 한다. 각 보드의 SCL, SDA 핀을 맞추고 I2C 기기의 핀을 연결한 다음 아래의 코드를 아두이노에서 실행하여 주소값을 기억해 두자.
|
1
2
3
4
5
6
7
8
9
10
11
12
13
14
15
16
17
18
19
20
21
22
23
24
25
26
27
28
29
30
31
32
33
34
35
36
37
38
39
40
41
42
43
44
45
46
47
48
49
50
51
52
53
54
55
56
57
58
59
60
61
62
63
64
65
66
67
68
69
70
71
72
73
74
75
|
// --------------------------------------
// i2c_scanner
//
// Version 1
// This program (or code that looks like it)
// can be found in many places.
// For example on the Arduino.cc forum.
// The original author is not know.
// Version 2, Juni 2012, Using Arduino 1.0.1
// Adapted to be as simple as possible by Arduino.cc user Krodal
// Version 3, Feb 26 2013
// V3 by louarnold
// Version 4, March 3, 2013, Using Arduino 1.0.3
// by Arduino.cc user Krodal.
// Changes by louarnold removed.
// Scanning addresses changed from 0...127 to 1...119,
// according to the i2c scanner by Nick Gammon
// https://www.gammon.com.au/forum/?id=10896
// Version 5, March 28, 2013
// As version 4, but address scans now to 127.
// A sensor seems to use address 120.
// Version 6, November 27, 2015.
// Added waiting for the Leonardo serial communication.
//
//
// This sketch tests the standard 7-bit addresses
// Devices with higher bit address might not be seen properly.
//
#include <Wire.h>
void setup() {
Wire.begin();
Serial.begin(9600);
while (!Serial); // Leonardo: wait for serial monitor
Serial.println("\nI2C Scanner");
}
void loop() {
int nDevices = 0;
Serial.println("Scanning...");
for (byte address = 1; address < 127; ++address) {
// The i2c_scanner uses the return value of
// the Write.endTransmisstion to see if
// a device did acknowledge to the address.
Wire.beginTransmission(address);
byte error = Wire.endTransmission();
if (error == 0) {
Serial.print("I2C device found at address 0x");
if (address < 16) {
Serial.print("0");
}
Serial.print(address, HEX);
Serial.println(" !");
++nDevices;
} else if (error == 4) {
Serial.print("Unknown error at address 0x");
if (address < 16) {
Serial.print("0");
}
Serial.println(address, HEX);
}
}
if (nDevices == 0) {
Serial.println("No I2C devices found\n");
} else {
Serial.println("done\n");
}
delay(5000); // Wait 5 seconds for next scan
}
|
cs |
https://learn.sparkfun.com/tutorials/i2c/all
I2C - learn.sparkfun.com
Introduction In this tutorial, you will learn all about the I2C communication protocol, why you would want to use it, and how it's implemented. The Inter-Integrated Circuit (I2C) Protocol is a protocol intended to allow multiple "slave" digital integrated
learn.sparkfun.com
'메이킹 > 메이킹 준비' 카테고리의 다른 글
| 아두이노 I2C LCD 모듈 사용하기 (0) | 2021.05.03 |
|---|---|
| 아두이노를 위한 Serial(UART) 통신 알아보기 (0) | 2020.08.20 |
| 아두이노 프로 특징 및 사용법 (0) | 2020.04.20 |
| 카카오톡 학식봇 만들기-json 파일이란? (0) | 2020.02.25 |
| 아두이노 OLED 사용기 (0) | 2019.12.27 |